Resistive Wheelsets are the Backbone of Modern Train Block Detection
The ability to detect current flow between the rails using the Twin-T detection circuit dates back to 1958. Linn Westcott introduced a two-transistor circuit that detected the current flowing through the motor or lighted car to indicate when a block was occupied. It wasn't long before rolling stock started being equipped with resistors that could trigger the detection circuit without placing a significant load on the power supply. While we've made advances in the method of detection and the sensitivity and accuracy in the intervening decades, the basic idea remains the same.
I'm using an inductive coil solution from RR Cirkits that operates as an LCC node. The process that I am describing here is the same no matter what detection method or technology you use.
Wheel and Axle Types
For detection to work, you must have metal wheels, as you need a method to pass current between the rails! There are a number of ways to upgrade your equipment with after-market wheelsets. What you need to know is that there are two significant types to use and when to use them!
If you have metal trucks, which are common on older equipment, brass models, and passenger cars, you will probably have to use wheels that have plastic axles to prevent a direct short-circuit. Kadee products offers metal wheelsets with plastic axles that suit this requirement. Note that this isn't always a hard rule - some metal trucks are insulated, but if you aren't sure, it's best to go with plastic axles.
For plastic trucks, metal wheels with metal axles are preferred as it makes the installation of resistors easier. The axle is bonded to one wheel but connected to the other wheel with an insulated bushing. Personally, I use Walthers wheels to upgrade my rolling stock. They are available in packs of 100 (25 cars) and priced at about $0.65 per axle. The best part of this wheel type is that the insulated wheel and axle are perfectly flat, making it easy to apply the resister to the back of the wheel and get a good bond. Another common brand (and high quality) is Intermountain. These are a few cents more and while similar to the Walthers wheels, they have a small bulge where the axle meets the wheel. You need to install the resistor at an angle over the bulge, which makes the installation a tad more "fiddly".
Materials
Once you have your wheelsets of choice, you will need the following items:
- "chip" resistors in 5 to 10K Ohms. Check the specifications for your detector for the recommended resistance, but 5-10K is the most common range. A higher value draws less current but might require more sensitive detectors. I got mine from Amazon - $5 for 100. These are for metal axle wheelsets.
- standard 1/4 or 1/8-watt resistors in the same resistance as the chip resistors. These will be used on wheelsets with plastic axles. Some people have used resistance paint to join the two wheels by painting the axle, but the resistance paint is difficult to use (constant mixing needed) and obtain accurate and consistent results. I don't have as many of these type of axles, so I prefer the resistor method. Again, I sourced a pack of 50 on Amazon.
- Conductive Silver Paint (Ink). This is the most expensive part of the solution as the bottle contains ground silver in a lacquer that becomes conductive once dry. An 8g bottle cost over $30 on Amazon, but this will easily do hundreds if not close to 1000 axles.
- CA - specifically IC-2000 rubberized CA from Bob Smith Industries.
- Toothpicks or a micro-brush - this is used to apply the silver paint to the resistors.
- X-Acto knife with #11 blade, tweezers, and (optional but helpful) a fiberglass brush.
- Not required, but I found that an axle holder was a big help in "mass producing" these. I designed a tray to hold the chips and secure 6 wheelsets in either vertical or horizontal orientation. You can purchase one of my trays or the STL file to print your own from my web store.
Type 1 - Metal Axles
I start by brushing the insulated wheel and the axle with a fiberglass brush to remove any oxidation or coating that could interfere with the operation. I then stand the wheel vertically in my assembly tray. For me - I use two trays and work on 12 axles at a time.
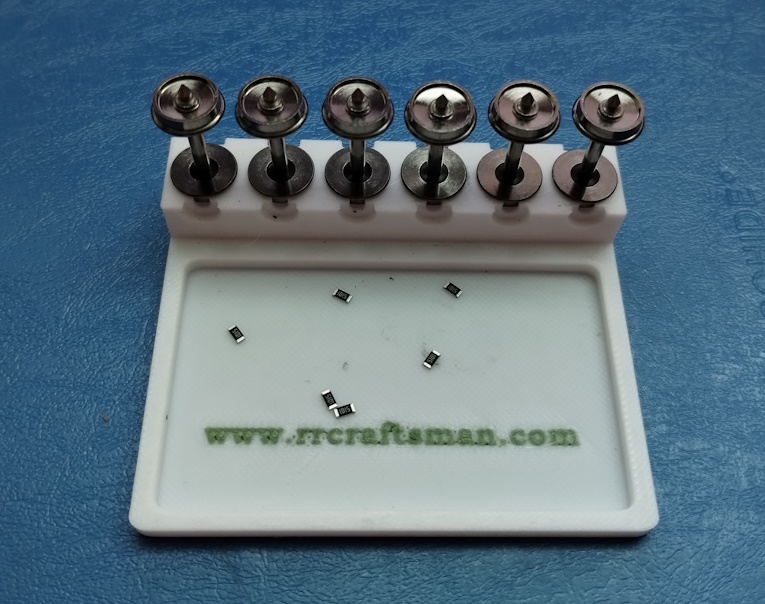 Photo 1 - Wheelsets and chips in the assembly tray
I count out 6 resistors and drop them into the assembly tray, then repeat for the second tray. See photo 1
Once both trays are set up, I apply a small drop of IC-2000 CA to the insulated wheel, right where the insulator joins the wheel. I do 3 wheels at a time. Using tweezers, I place a resistor chip onto the drop of CA so that one end of the chip touches the axle and the other is on the wheel. Be careful not to use too much CA or to get CA between the chip and the axle. Do the next 3 axles, then set aside and proceed with the second group.
I allow a few minutes for the CA to dry before proceeding. Once at least 5 minutes has passed, I use my X-Acto knife to remove any excess CA from the chip contacts. A quick brush with the fiberglass pen ensures that the contacts are clean. Now we're ready to apply the Silver Paint.
Shake the bottle - a lot. Now shake it some more! You need to distribute the heavy silver particles in the lacquer for this process to work. Go ahead, give it one more shake!! Open the bottle and using your toothpick or micro-brush, get some paint from the brush in the bottle cap, then place a dab on the end of the resistor. You need enough paint to cover the contact on the chip and make contact with either the axle or the wheel, depending on which end you start with. You might find it easier to switch the axles to the horizontal position in the tray with the
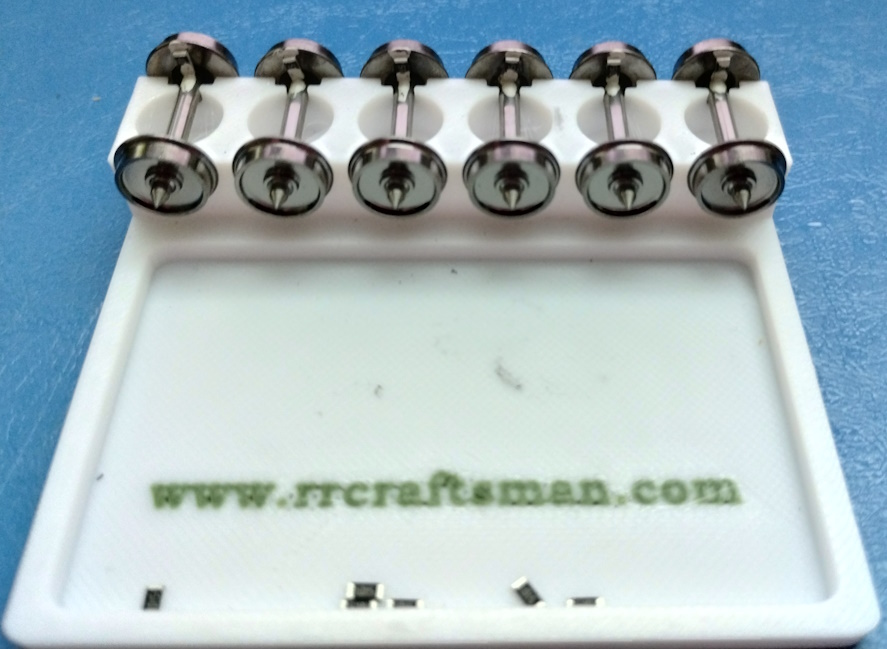 Photo 2 - Assembly tray with completed wheelsets
resistors toward the rear. Be careful not to paint the entire resistor or you will have a dead short! You may need to add a second drop of paint to make good contact at both ends of the resistor. Again, I work on 3 axles at a time and shake the bottle between applications.
Allow the paint at least 10 minutes to dry. Check the resistance between the outside of the wheels using an ohmmeter and verify that the resistance is in-spec. 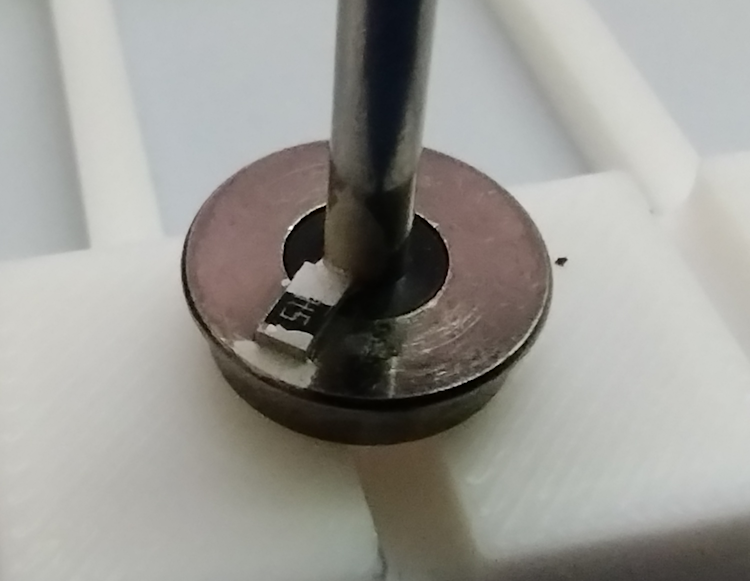 Very high resistance can mean that the paint hasn't yet cured - be patient. Once the resistance is close to what I expect I place the wheelset into a box for later installation into a car. If you get an open circuit, I test from wheel-to-wheel side of the chip and then axle to axle side of the chip. Usually, one of those would be zero ohms and the other would be open. I scrape the open side clean and re-apply the silver paint. The close-up photo to the right shows the chip and the silver paint applied.
I use 5.1K Ohm resistors and install one resistor wheelset per car. Others use 10K resistors and apply 2 resistor axles per car - the end result is roughly the same load on the system.
Photo 2 shows the resistors applied to the wheelsets and the silver paint making the connection.
Type 2 - Plastic Axles
The Kadee wheelset that I am using is chemically blackened and, while conductive, doesn't provide a good electrical connection for the wire and silver paint. I use my X-Acto knife or a small file to clean the coating away and expose bare metal on each wheel. The photo shows the edge of the wheel cleaned, but I actually scraped the area hidden by the loop of the resistor lead, and that is where the silver paint will be applied - not near the edge of the wheel.
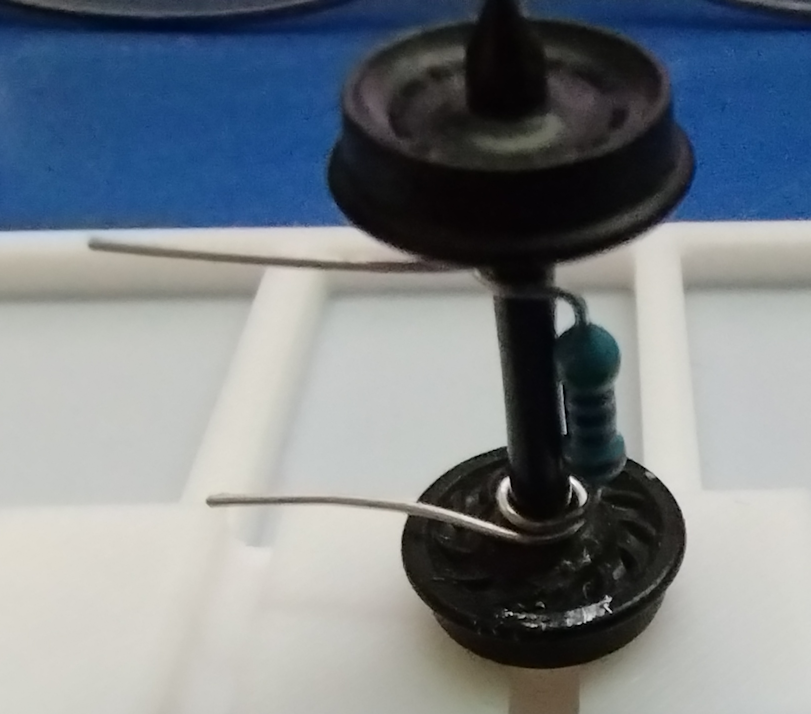 Photo 3 - Plastic Axle method
I start assembly by bending the leads on the resistor 90-degrees as close to the resistor body as possible. I then wrap the lead around the axle to form a complete loop, keeping the resistor snug against the axle. I then apply a drop of IC-2000 CA to bond the resistor to the axle. The rubberized CA fills the gap and creates a secure bond but needs at least 10 minutes of cure time before proceeding. Again, I like to work in small batches to keep things moving along.
Once the CA has cured, I continue to wrap the resistor lead until it can contact the bare metal. I trim any excess lead with a pair of wire nippers and then apply a drop of silver paint (did you remember to shake it?) covering the resistor lead and the bare metal on the wheel. Apply silver paint to the opposite wheel and set the assembly aside to dry. After 15 minutes or so, you can verify the resistance between the two wheels. Note that you can solder the wire to the wheels, but you need to use extreme caution not to melt the axle. The wire is close to the axle and the wheel needs a fair bit of heat for the solder to bond - the paint method is safer overall.